


封面配图PID 74975502
本来想偷个懒,找一些dalao写过的教程照葫芦画瓢画一个出来。无奈全网有关搭建的教程少之又少,咱只好从官方文档开始摸起,顺便在这里记录一下踩坑的过程,,
- 前言
1.DNS over TLS 是什么?
它是通过传输层安全协议(TLS)来加密并打包域名系统(DNS)的安全协议。此协议旨在防止中间人攻击与控制DNS数据以保护用户隐私。(摘自中文维基↗)
如果你使用境外的安全DoT( DNS over TLS 的缩写,下同),这可以有效防止某墙的DNS污染。
安卓Pie已原生支持DoT,部分国产ROM及部分应用内置DNS查询除外。打开 设置 → 网络和Internet → 高级 → 私有DNS 就是DoT的设置界面了。
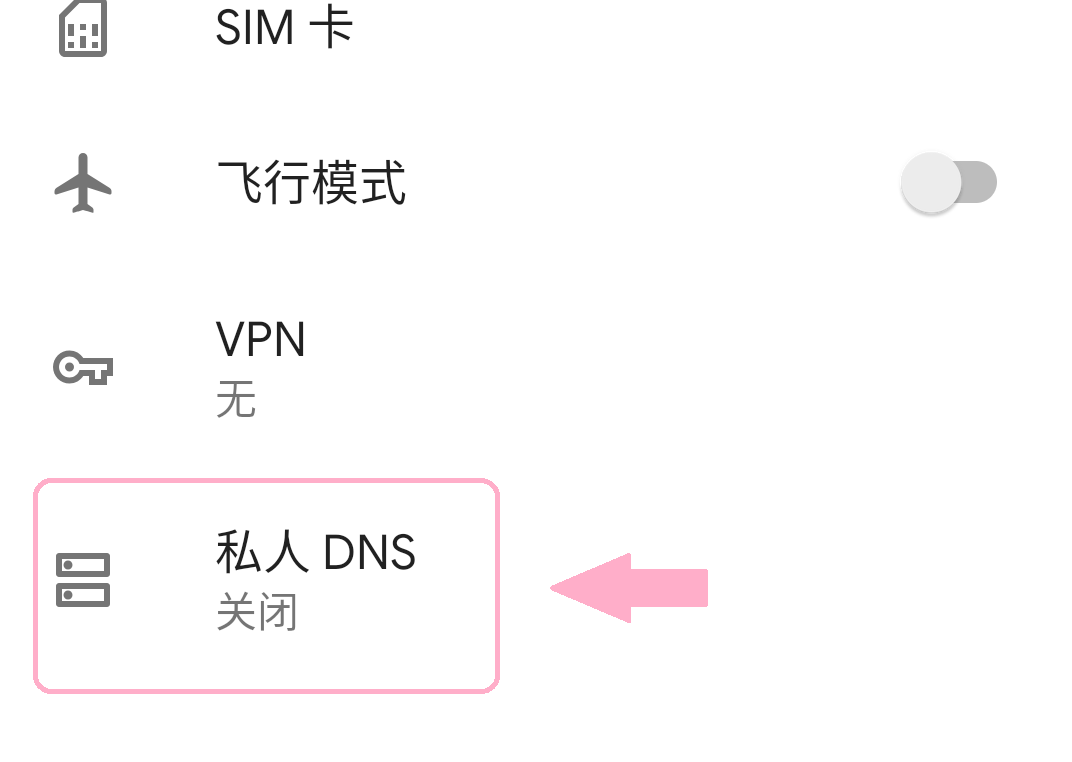
2.Unbound 是什么?
Unbound 是优秀的DNS解析器,适合咱们萌新使用。
3.为什么要自己搭建DoT呢?一些公共的DNS服务不都提供DoT了吗?
因为境外的一些DoT服务器,如 Cloudflare 、 Google 的,因名气过大惨遭封杀,丢包严重(我所在的地区是这样的)。我们可以试着利用VPS搭建一个属于自己的DoT服务器。
左转Google 右转度娘
- 我们开始
首先,你需要一个域名并准备一张有效证书。你可以自签或者撸一张 Let’s Encrypt 的证。
关于 Let’s Encrypt 的证书可以参考这篇文章
然后国际惯例,备份数据然后更新系统
apt update
apt upgrade
- 安装本篇主角
Unbound
Ubuntu软件仓库已经有了,所以直接apt install就好,记得小写。
apt install unbound
进度条跑完后,这里有一个坑,你需要把TLS所用的证书、密钥文件复制到Unbound的配置文件所在目录。如果你在配置文件中指定了其他位置的证书文件,Unbound 很可能会因权限问题报错!即使你使用了chmod 4777等命令对证书文件权限进行了修改,Unbound 仍会报错!
2020.06.22 更新 ---- Unbound (版本1.6.7)已引入多文件配置,本文现采用多文件配置方案
配置文件基于 Ubuntu Server 18.04.4,不同版本的Ubuntu以及其他Linux发行版可能有差异
关于unbound.conf更多的细节可以参考 → https://nlnetlabs.nl/documentation/unbound/unbound.conf/
以及软件包自带的文档,通常被放置在这里/usr/share/doc/unbound/examples/unbound.conf
查看已有的配置文件,位于\etc\unbound\unbound.conf,里面只有一行:
include: "/etc/unbound/unbound.conf.d/*.conf"
表明Unbound将在unbound.conf.d文件夹中查找所有以.conf结尾的配置文件,并逐一载入。
在上述文件夹中新建一空文件,可取my-dot-server.conf这样以.conf结尾的文件名,并写入以下内容:
server:
        directory: "/etc/unbound"  # 证书所在目录
        # logfile: "/etc/unbound/unbound.log"  # 日志存放位置,如有需要可开启,注意文件权限
        interface: 0.0.0.0@853  # 监听IP:端口
        # interface: ::0@853  # 监听IPv6地址,可选
        access-control: 0.0.0.0/0 allow  # 允许来自全网的查询
        # access-control: ::1 allow  # 允许来自全网(IPv6)的查询

        ssl-service-key: "privkey.key"  # 证书对应密钥文件名
        ssl-service-pem: "fullchain.pem"  # 证书文件名
        ssl-port: 853  # DoT使用的端口,默认853
        incoming-num-tcp: 1000  # TCP缓存大小
        udp-upstream-without-downstream: yes
        qname-minimisation: yes  # 节省带宽

forward-zone:
        name: .  # 转发所有请求至上游服务器
        forward-ssl-upstream: yes  # 同样使用DoT的方式查询上游服务器
        forward-addr: 8.8.8.8@853  # 上游DNS服务器
保存修改后的配置,重启服务器(或者单单重启Unbound → 运行命令 service unbound restart)
到这里不出意外的话,Unbound服务器已经部署好了
如果你的VPS带有防火墙,请在防火墙中放行853端口的TCP连接
- 最后测试
这里使用kdig命令测试查询,你可能需要安装相应的工具包。Ubuntu下可使用apt install knot-dnsutils命令进行安装。
装好后运行命令:(将X.X.X.X替换为Unbound服务器IP)
kdig +tls @X.X.X.X www.google.com -d
成功后返回结果:(部分数据在这里用✦代替)
;; DEBUG: Querying for owner(www.google.com.), class(1), type(1), server(✦✦✦.✦✦✦.✦✦✦.✦✦✦), port(853), protocol(TCP)
;; DEBUG: TLS, received certificate hierarchy:
;; DEBUG:  #1, CN=✦✦✦✦✦.✦✦✦✦✦.✦✦✦  #你的证书CN名
;; DEBUG:      SHA-256 PIN: ✦✦✦✦✦✦✦✦✦✦✦✦✦✦✦✦✦✦
;; DEBUG:  #2, C=US,O=✦✦✦✦✦✦✦✦✦✦✦✦✦✦✦✦✦✦✦✦✦✦✦✦✦✦✦✦✦✦✦✦✦✦✦✦
;; DEBUG:      SHA-256 PIN: ✦✦✦✦✦✦✦✦✦✦✦✦✦✦✦✦✦✦✦✦✦✦✦✦=
;; DEBUG: TLS, skipping certificate PIN check
;; DEBUG: TLS, skipping certificate verification
;; TLS session (TLS1.2)-(✦✦✦✦✦✦-✦✦✦-✦✦✦✦✦✦✦✦✦)-(✦✦✦✦✦✦✦✦✦-✦✦✦✦✦✦✦✦✦)
;; ->>HEADER<<- opcode: QUERY; status: NOERROR; id: 65121
;; Flags: qr rd ra; QUERY: 1; ANSWER: 1; AUTHORITY: 0; ADDITIONAL: 0

;; QUESTION SECTION:
;; www.google.com.             IN    A

;; ANSWER SECTION:
www.google.com.         299    IN    A    172.✦✦✦.✦✦✦.✦✦✦

;; Received ✦✦ B
;; Time 20✦✦-✦✦-✦✦ ✦✦:✦✦:✦✦ ✦✦✦
;; From ✦✦✦.✦✦✦.✦✦✦.✦✦✦@853(TCP) in ✦✦✦.✦ ms
ANSWER SECTION:即Unbound服务器返回的查询结果。

我的配置文件
server:
directory: "/etc/unbound"
username: unbound
chroot: "/etc/unbound"
# logfile: "/etc/unbound/unbound.log" #不建议启用日志,因为这样会对服务器造成一定负担
pidfile: "/etc/unbound/unbound.pid"
interface: 0.0.0.0@853
# interface: ::0@853 #如果你想在IPv6上部署
access-control: 0.0.0.0/0 allow
# access-control: ::1 allow #同上,如果你想在IPv6上部署
ssl-service-key: "private.key" #你的证书密钥文件名
ssl-service-pem: "certificate.pem" #你的证书文件名
ssl-port: 853 #DoT所用的端口,默认是853
incoming-num-tcp: 1000
udp-upstream-without-downstream: yes
qname-minimisation: yes #节省带宽
forward-zone:
name: .
forward-ssl-upstream: yes
forward-addr: 8.8.8.8@853 #上游DNS服务器
错误信息
● unbound.service - Unbound DNS server
Loaded: loaded (/lib/systemd/system/unbound.service; enabled; vendor preset: enabled)
Active: failed (Result: exit-code) since Sun 2020-06-14 02:53:26 CST; 2s ago
Docs: man:unbound(8)
Process: 803831 ExecStartPre=/usr/lib/unbound/package-helper chroot_setup (code=exited, status=0/SUCCESS)
Process: 803834 ExecStartPre=/usr/lib/unbound/package-helper root_trust_anchor_update (code=exited, status=0/SUCCESS)
Process: 803839 ExecStart=/usr/sbin/unbound -d $DAEMON_OPTS (code=exited, status=1/FAILURE)
Main PID: 803839 (code=exited, status=1/FAILURE)
Jun 14 02:53:25 iZuf68m68yy5bvt6xoqrzjZ systemd[1]: unbound.service: Main process exited, code=exited, status=1/FAILURE
Jun 14 02:53:25 iZuf68m68yy5bvt6xoqrzjZ systemd[1]: unbound.service: Failed with result 'exit-code'.
Jun 14 02:53:25 iZuf68m68yy5bvt6xoqrzjZ systemd[1]: Failed to start Unbound DNS server.
Jun 14 02:53:25 iZuf68m68yy5bvt6xoqrzjZ systemd[1]: unbound.service: Scheduled restart job, restart counter is at 5.
Jun 14 02:53:26 iZuf68m68yy5bvt6xoqrzjZ systemd[1]: Stopped Unbound DNS server.
Jun 14 02:53:26 iZuf68m68yy5bvt6xoqrzjZ systemd[1]: unbound.service: Start request repeated too quickly.
Jun 14 02:53:26 iZuf68m68yy5bvt6xoqrzjZ systemd[1]: unbound.service: Failed with result 'exit-code'.
Jun 14 02:53:26 iZuf68m68yy5bvt6xoqrzjZ systemd[1]: Failed to start Unbound DNS server.
@Naruse 请检查配置文件中的缩进是否正确,以及证书是否正确放置在了chroot路径中。
@柊 ゆり子 我貌似依然无法设置?是国内服务器的问题吗?
@柊 ゆり子 大佬加个QQ?这样效率会比较高
@Naruse 抱歉我不使用QQ..电报的联系方式在页面底部左侧,用电报联系我吧 qwq
hi.
[root@host ~]# unbound -c /usr/local/etc/unbound/unbound-by-me.conf
[1577984771] unbound[12563:0] warning: too many file descriptors requested. The builtinmini-event cannot handle more than 1024. Config for less fds or compile with libevent
[1577984771] unbound[12563:0] fatal error: too much tcp. not enough fds.
[root@host ~]#
遇错如上。如何解决?unbound-by-me.conf是copy了你的配置文件内容。
@fish 看起来是 unbound 的版本问题
旧版本的 libevent 不兼容
请尝试一下升级 unbound ,然后重试
PS: 我现在使用的是 Ubuntu 18.04 + unbound 1.6.7-1
升级 unbound 的方法:apt update 后执行 apt upgrade unbound
@柊 ゆり子 hi.
我另外搞了台ubuntu vps.
root@rd:~# unbound -c /etc/unbound/unbound-by-me.conf
/etc/unbound/unbound-by-me.conf:22: error: unknown keyword 'tls-service-key'
/etc/unbound/unbound-by-me.conf:22: error: stray ':'
/etc/unbound/unbound-by-me.conf:22: error: stray '"'
/etc/unbound/unbound-by-me.conf:22: error: unknown keyword 'privkey.pem'
/etc/unbound/unbound-by-me.conf:22: error: stray '"'
/etc/unbound/unbound-by-me.conf:24: error: unknown keyword 'tls-service-pem'
/etc/unbound/unbound-by-me.conf:24: error: stray ':'
/etc/unbound/unbound-by-me.conf:24: error: stray '"'
/etc/unbound/unbound-by-me.conf:24: error: unknown keyword 'fullchain.pem'
/etc/unbound/unbound-by-me.conf:24: error: stray '"'
/etc/unbound/unbound-by-me.conf:26: error: unknown keyword 'tls-port'
/etc/unbound/unbound-by-me.conf:26: error: stray ':'
/etc/unbound/unbound-by-me.conf:26: error: unknown keyword '853'
read /etc/unbound/unbound-by-me.conf failed: 13 errors in configuration file
[1578215251] unbound[21539:0] fatal error: Could not read config file: /etc/unbound/unbound-by-me.conf
root@rd:~# cat /etc/unbound/unbound-by-me.conf
server:
directory: "/etc/unbound"
username: unbound
chroot: "/etc/unbound"
# logfile: "/etc/unbound/unbound.log" #uncomment to use logfile.
pidfile: "/etc/unbound/unbound.pid"
# verbosity: 1 # uncomment and increase to get more logging.
# listen on all interfaces on port 853, answer queries from the local subnet.
interface: 0.0.0.0@853
interface: ::0@853
tls-service-key: "privkey.pem"
tls-service-pem: "fullchain.pem"
tls-port: 853
incoming-num-tcp: 1000 # Number of simultaneous incoming TCP connections per thread to allow
# Listen on UDP but still issues queries upstream over UDP.
# Only available in 1.6.7 and later
udp-upstream-without-downstream: yes
qname-minimisation: yes # Enable QNAME minimisation to increase client privacy
root@rd:/etc/unbound#
活见鬼,怎么会出现这些错误?
@fish 请检查配置,看上去您给出的 unbound-by-me.conf 中第 2-14 行前未添加制表符,第十行中的 ' tls-service-key: "privkey.pem" ' 需要另起一行
unbound 对于配置文件格式要求比较严格..
@fish 翻了一下文档,在 Unbound 新版本中确实已将 ssl-* 改为 tls-*
感谢您的反馈,文章现已更新 qwq
@fish 终于搞定。不是什么制表符的问题。需要把
tls-service-key: "privkey.pem"
tls-service-pem: "fullchain.pem"
tls-port: 853
forward-tls-upstream: yes
分别改为:
ssl-service-key: "privkey.pem"
ssl-service-pem: "fullchain.pem"
ssl-port: 853
forward-ssl-upstream: yes
@fish 告诉我你的email地址,我发vps的登陆细节给你,你登陆进去,帮我搞一下。
@ 柊 ゆり子 按下Tab 键,输入directory: "/etc/unbound" ,
然后又按下Tab 键,输入username: unbound吗?
没有用啊。问题依旧
@fish 可以按下Tab 键输入制表符,制表符就是将 "directory" "username" 等表示为 "server" 的子项
如果没有制表符, "directory" "username" 等就会与 "server" 表示为一个项了
而实际上 "server" 是一个大的项, "directory" "username" 等作为 "server" 下的子项。
详细可以看看我在博客正文中所给出的 unbound.conf 内容
@柊 ゆり子 什么是制表符?
@fish root@rd:/etc/unbound# unbound -v
[1578215677] unbound[21553:0] notice: Start of unbound 1.6.7.
root@rd:/etc/unbound#
root@rd:/etc/unbound# cat /etc/os-release
NAME="Ubuntu"
VERSION="18.04 LTS (Bionic Beaver)"
ID=ubuntu
ID_LIKE=debian
PRETTY_NAME="Ubuntu 18.04 LTS"
VERSION_ID="18.04"
HOME_URL="https://www.ubuntu.com/"
SUPPORT_URL="https://help.ubuntu.com/"
BUG_REPORT_URL="https://bugs.launchpad.net/ubuntu/"
PRIVACY_POLICY_URL="https://www.ubuntu.com/legal/terms-and-policies/privacy-policy"
VERSION_CODENAME=bionic
UBUNTU_CODENAME=bionic
root@rd:/etc/unbound#
配置报错呢 可以私聊你吗
@liji 嗯呐,可以留下联系方式吗?